


Make your very personal sweater pumpkins in minutes with this straightforward tutorial! It’s one of many best and most inexpensive fall crafts, plus it’s enjoyable to do with different folks for a enjoyable fall women evening!
Make one or make a complete pumpkin patch filled with sweaters – it’s as much as you however be forewarned, when you get began, you could not need to cease! My sister was imagined to create one for this tutorial and ended up making one for everybody in her household!
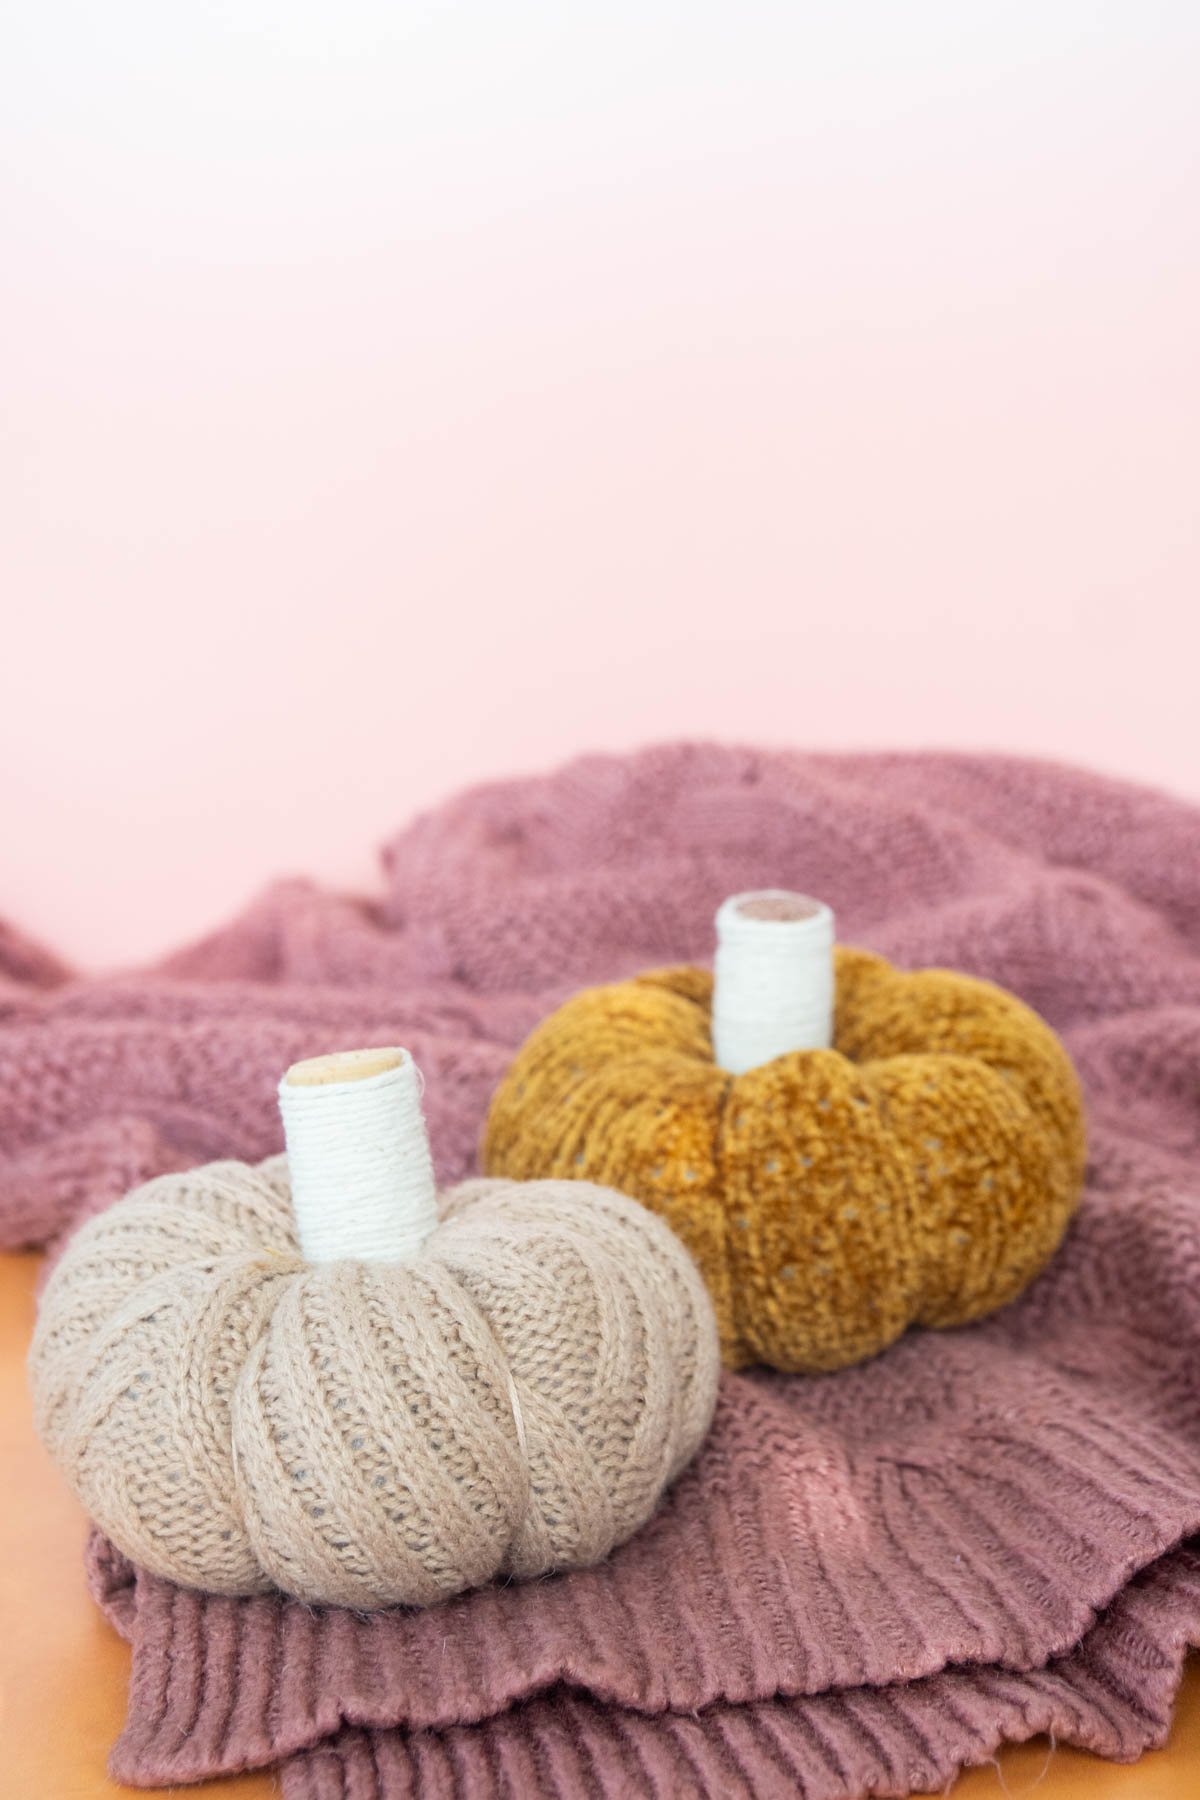
DIY Sweater Pumpkins
Whether or not you’re right here since you noticed the viral pumpkin sweater video on our Instagram account or simply since you noticed this enjoyable craft elsewhere, we’re glad you’re right here!
A couple of weeks in the past we have been searching for some upcoming fall artwork tasks and I noticed a bunch of sweater pumpkins at one of many shops. I beloved the thought and purchased a pair then realized that we might most likely make our personal.
I grabbed a bunch of fall coloured sweaters at a thrift retailer, made some cake combine pumpkin cookies and spiced apple cider, invited some mates over, and we had a good time making all kinds of pumpkin sweaters which might be comfortable, fluffy, and simply lovely.
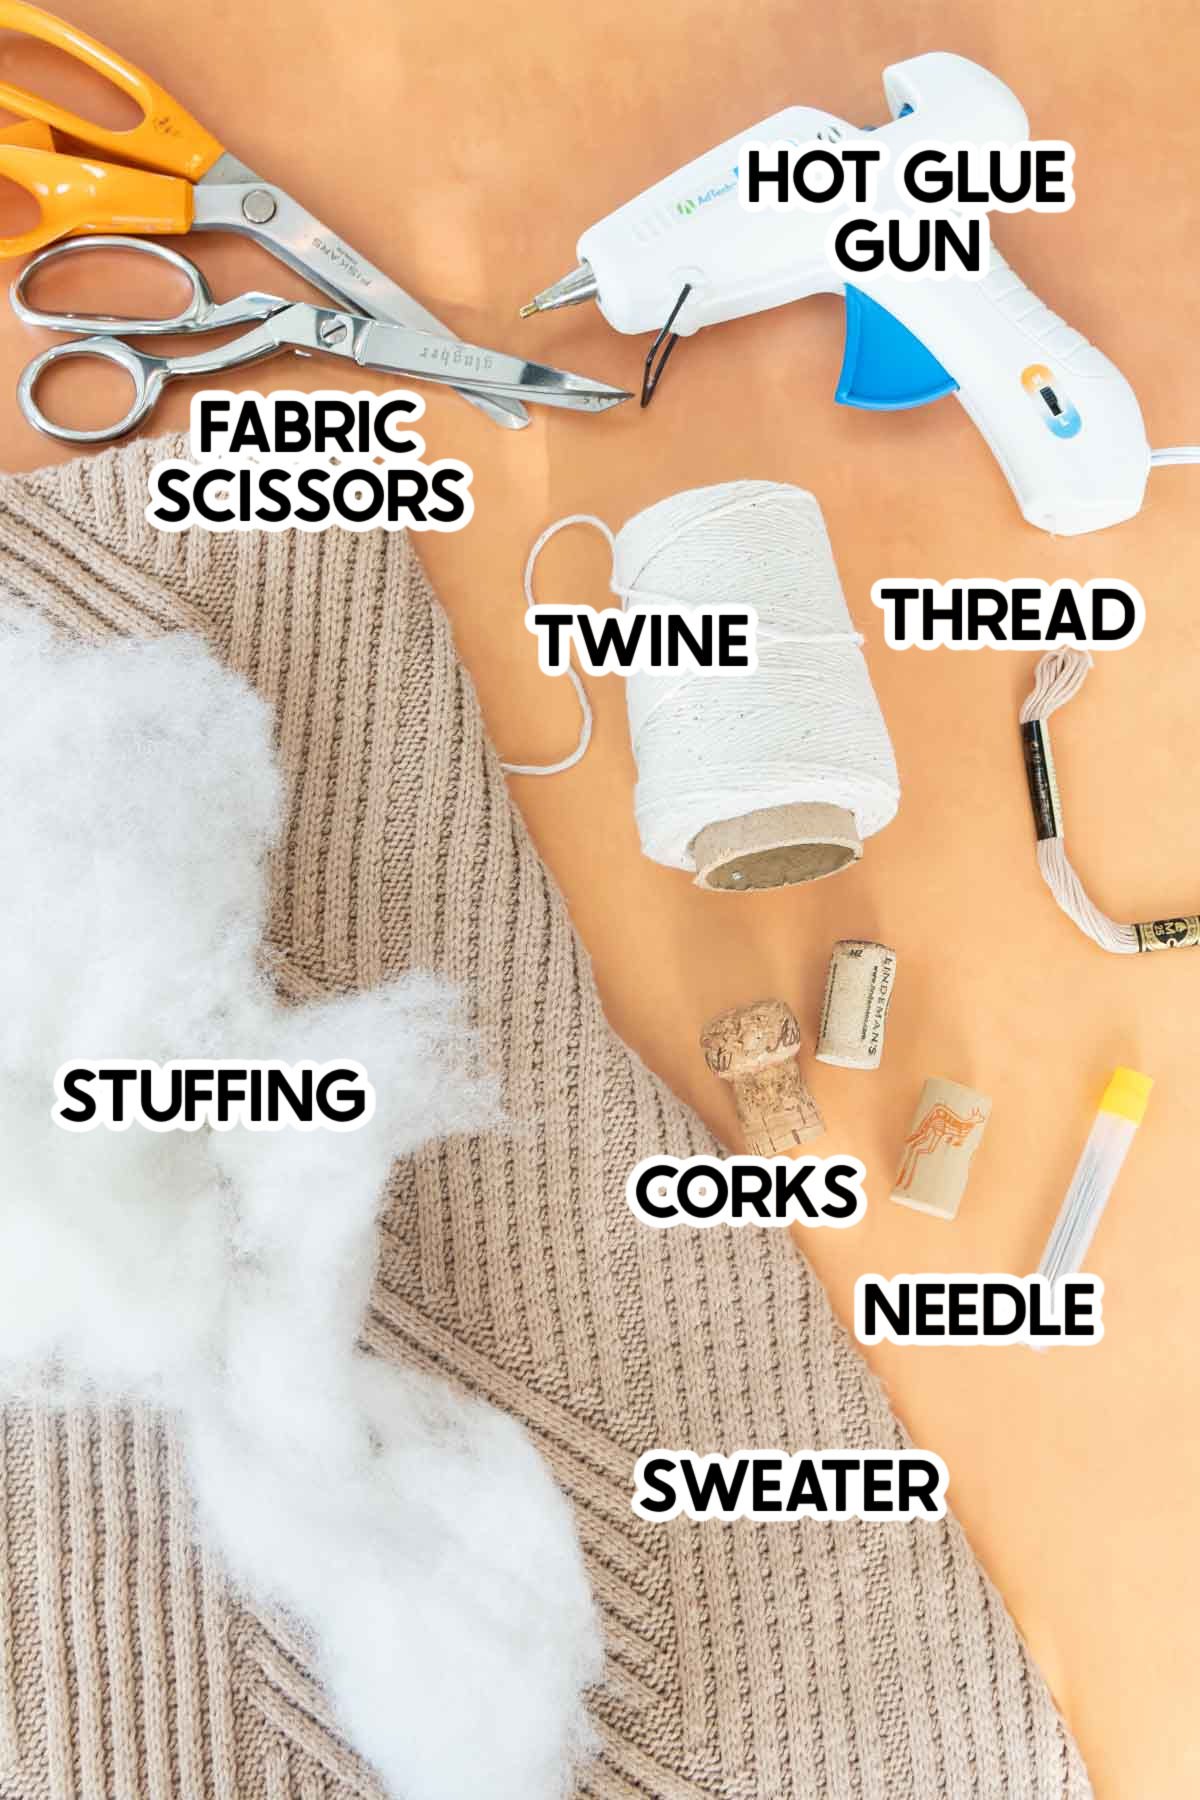
- Cloth Scissors – I really like these Ginghers a lot. They’re the gold normal in cloth scissors and in case you solely use them on cloth, they’ll final without end. I simply checked and I purchased mine in 2013 and so they’re nonetheless going sturdy.
- Stuffing – that is the stuffing we used, it was good for the pumpkins! One 32-oz bag made two giant pumpkins (from the physique of the sweaters) and 10ish small sleeve pumpkins.
- Twine – I simply used impartial coloured butcher’s twine as a result of it’s what I had readily available however you might additionally use precise jute coloured twine like this, no matter you suppose seems finest.
- Corks – any sort of corks work, I simply grabbed some extras my neighbors had readily available however you might additionally purchase a pack like this in case you don’t have any. Or you might use sticks too!
- Thread – we used embroidery thread that matched the colour of the sweaters. You might additionally simply use stitching thread, however I personally suppose the thicker thread does a greater job of pulling within the pumpkin sections and gained’t break as simply! You possibly can both have folks convey thread that matches their sweater or purchase an inexpensive pack like this with one million colours – they’re more likely to discover one thing that matches!
- Sweaters – every sweater will provide you with one giant pumpkin plus 2-4 small pumpkins relying on how massive you need to make them! I’ve included some notes under for selecting sweaters that can work finest to make pumpkins.
Suggestions for selecting sweaters
Sadly not all sweaters will work for these pumpkin crafts or at the very least some sweaters will work higher for others.
I like to recommend avoiding sweaters which have:
- Giant gaps, holes, or spacing within the design – you want to have the ability to sew the sweater collectively and enormous areas make it robust to do this.
- Lower sides, slits, or completely different size sides – you need to have the ability to reduce the sweater into one even rectangle so if there are slits or completely different lengths, you’ll find yourself having to waste numerous the sweater!
- Lace or any form of intricate designs – you’re going to be stitching by the pumpkin and pulling it tight. Keep away from something that may rip, tear, or be troublesome to work with once you thread by it.
- Zippers, buttons, or different chunky items – these are all going to be actually onerous to drag thread by!
- Cardigans – you need one thing that’s closed, not open.
- Materials that don’t stretch – persist with one thing that’s fluffy, chunky, and can stretch will when full of the pillow stuffing!
The way to Make Sweater Pumpkins
Right here’s every part it is advisable to find out about making these sweater pumpkins. Should you get misplaced, be happy to take a look at the video instance on the backside of this publish or the images that can assist you determine it out. I promise they’re actually newbie pleasant! Let’s get began.
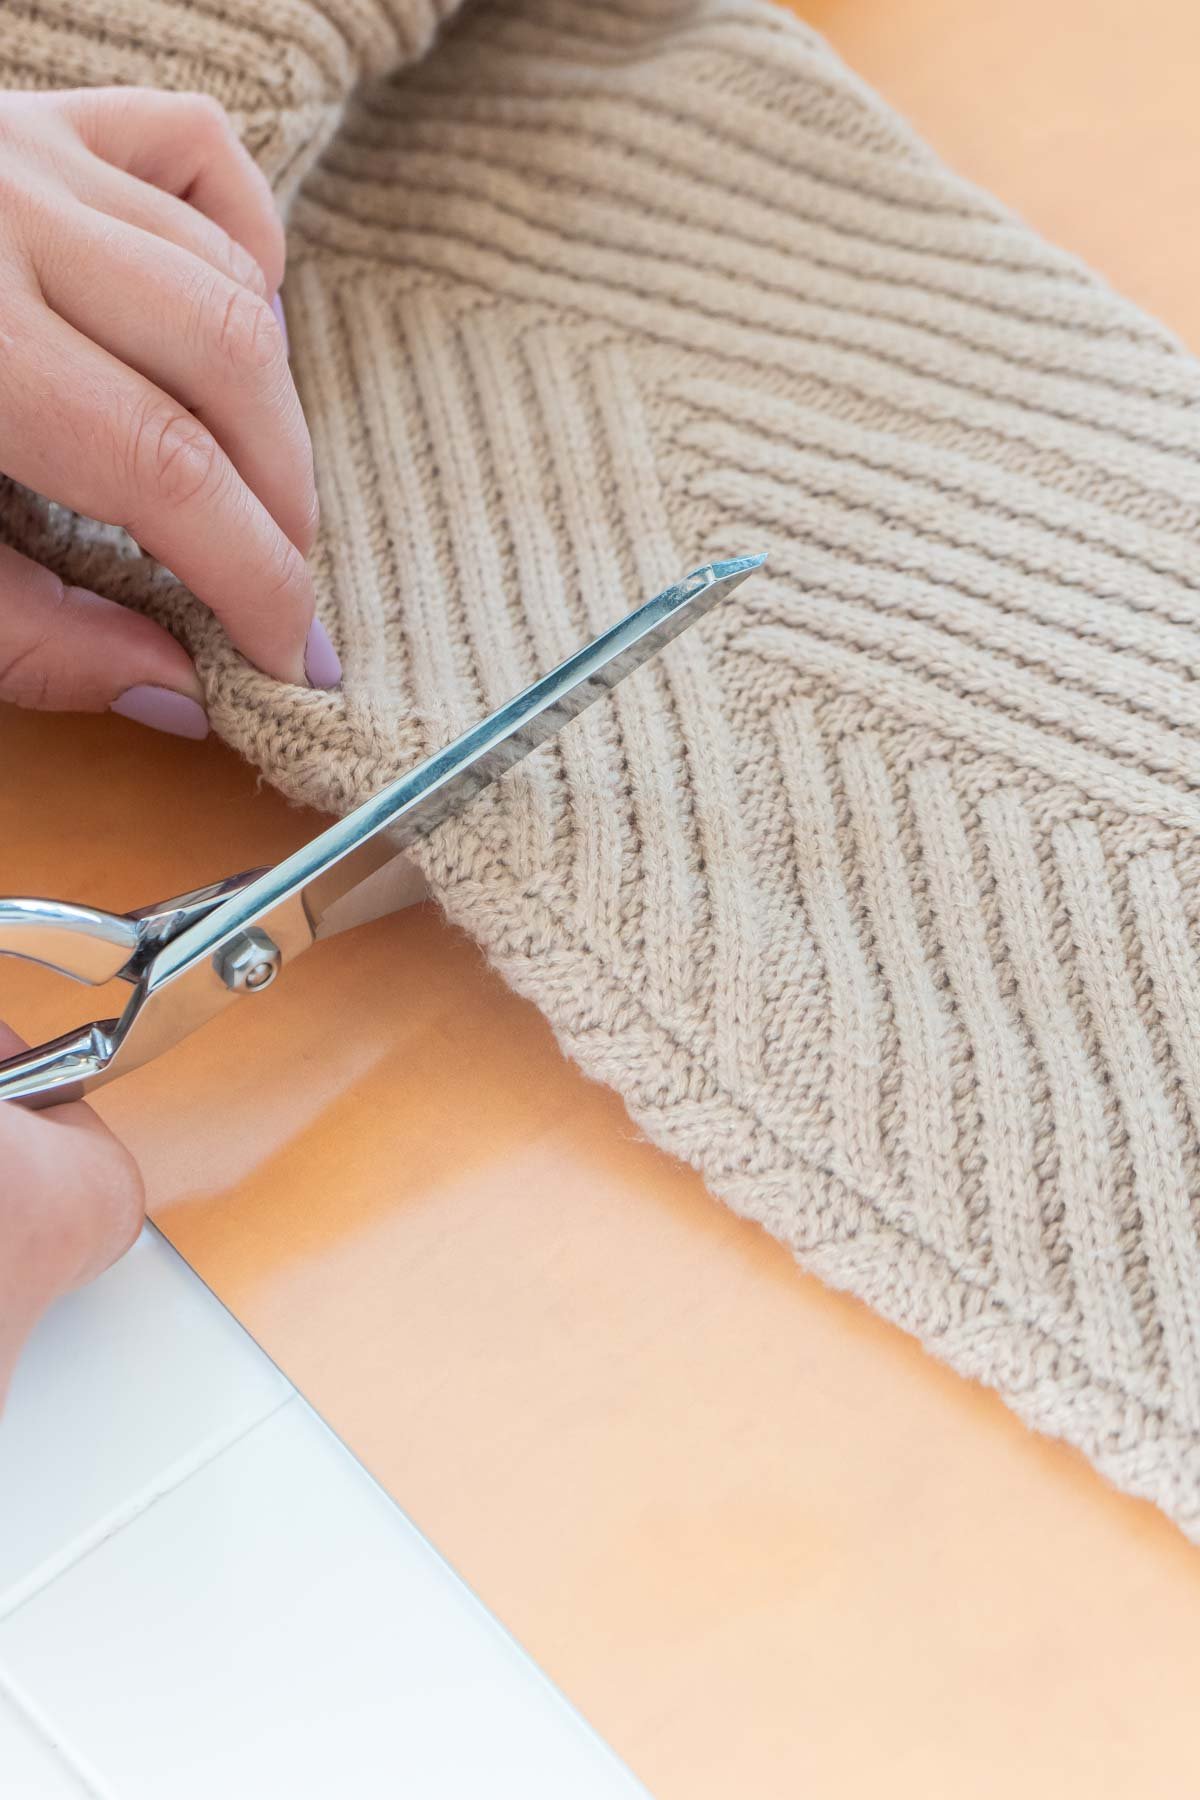
1 – Lower The Cloth
To begin, resolve what dimension pumpkin you need. For bigger pumpkins, it would be best to use the torso of the sweater, medium pumpkins are finest performed with the sleeves, and the cuffs make the proper small pumpkins.
When you resolve the form, it’s time to reduce the material out. If you’re utilizing a sleeve or cuff, lay the sweater sleeve horizontally throughout a flat floor. Then make one straight vertical reduce from the seam of the sleeve to the highest. This can detach the sleeve from the sweater utterly.
Now that the sleeve is indifferent, it is advisable to make one other vertical reduce from the seam to the highest. This reduce must be a minimal of 4 inches away from the primary reduce. The larger part of cloth the taller your pumpkin can be. I like to recommend making it no greater than 8 inches extensive for a sleeve.
Now you need to be left with a 4 to eight inch tube of cloth. After you have that you’re prepared to maneuver on to the following step.
Be sure to save the remainder of that sleeve if you wish to make a set of pumpkins.
3 – Sew The Pumpkin
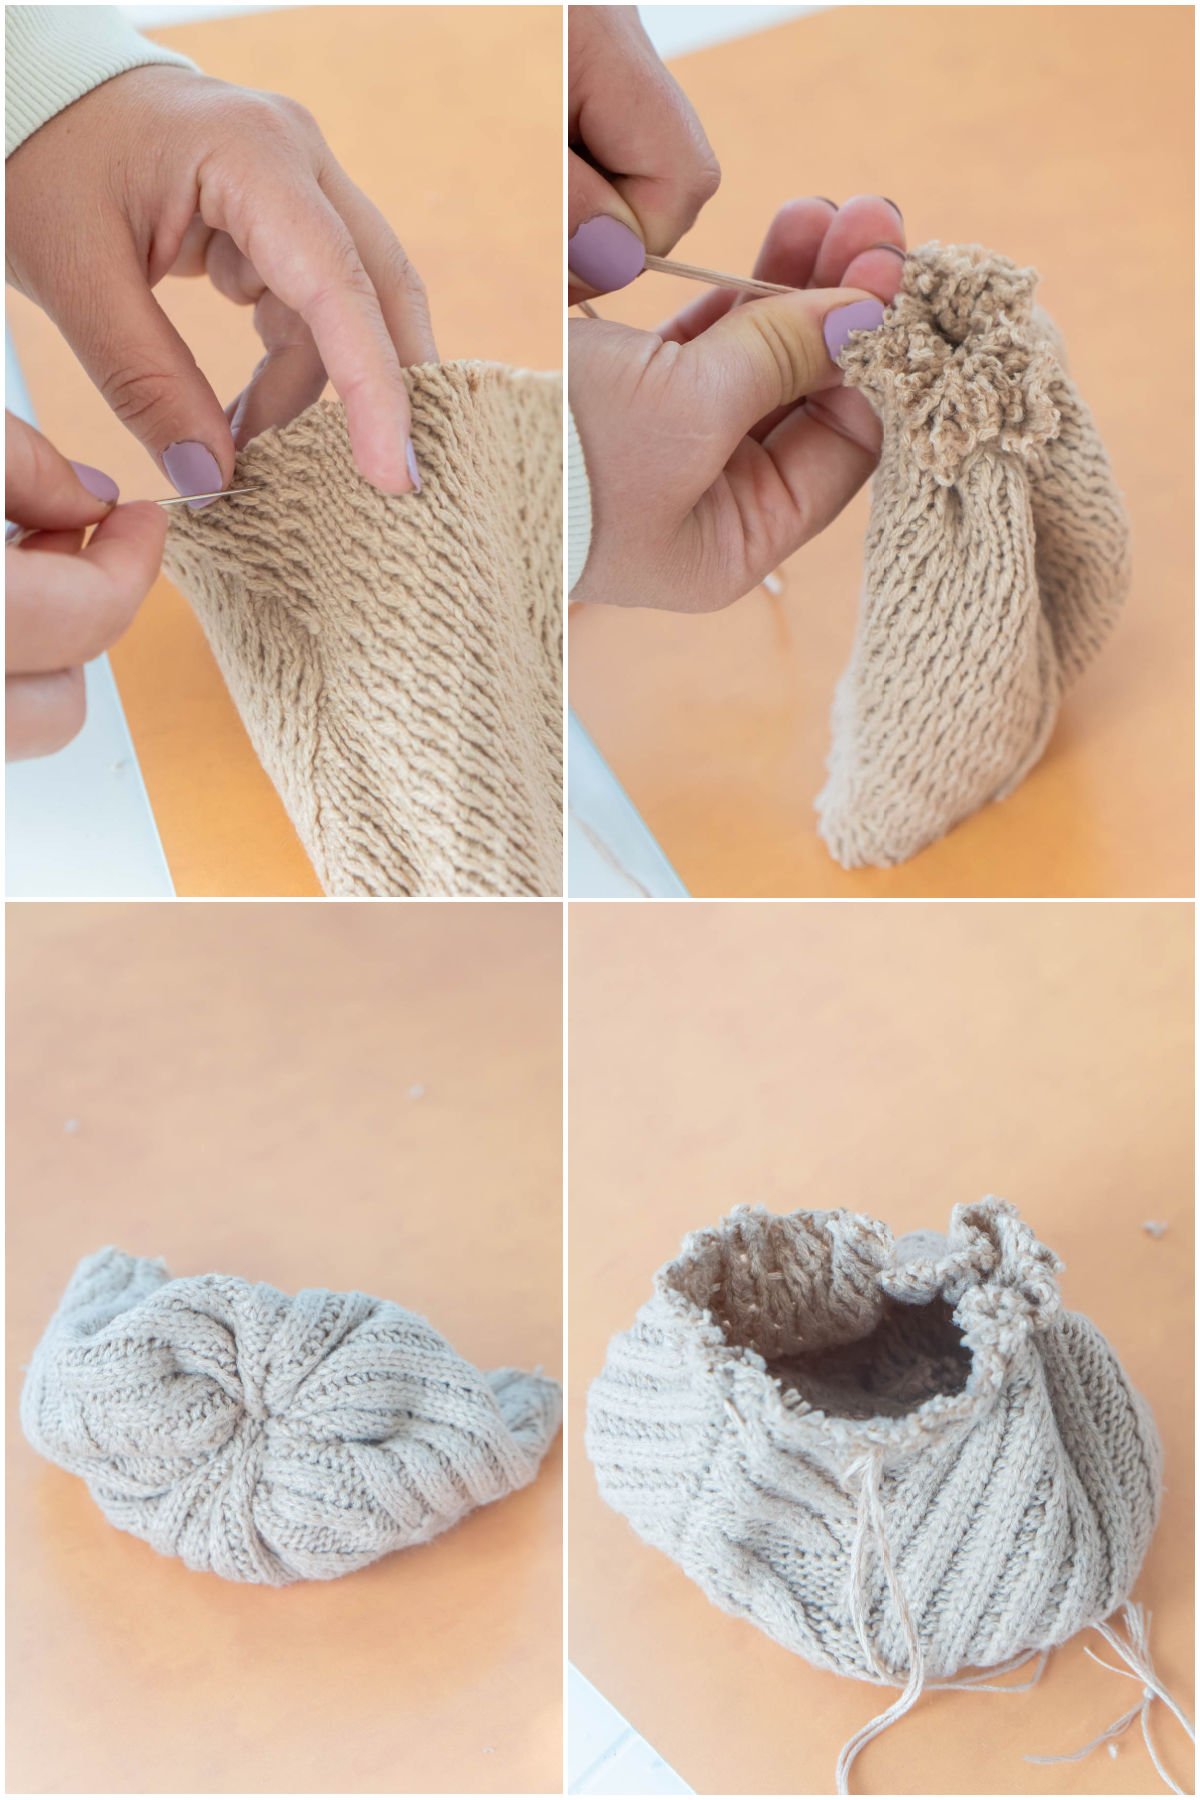
Start by threading your needle and tying the 2 ends of your thread collectively so you’ve gotten double the thread. You want sufficient thread to go across the circumference of your sleeve opening one and a half occasions.
Sew the Pumpkin High
Subsequent, flip your sleeve cloth inside out so the seam is on the surface.
For this mission, you can be utilizing a working sew. An instance of the working sew may be discovered right here. It principally simply means going out and in of the material in a straight line.
Begin your working sew, roughly 1 / 4 inch from the sting of your opening.
Proceed your working sew all the way in which across the fringe of the of the circle till you get again to the place you started your sew. Don’t sew by each side of the sleeve at one time!
When you get to the place you started your sew, take your two ends and pull them tightly till you shut up the circle.
Tie off the 2 ends, making them as tight as doable in order that the circle is closed.
Lower any free strings off and flip your cloth inside out in order that the tough edges are inside the pumpkin.
Sew The Backside
Thread the needle similar to you probably did earlier than and once more do a working sew across the exterior of the ultimate opening.
When you make it again to the place you started stitching gently let the needle and different finish of the thread lay to the aspect whilst you add the stuffing.
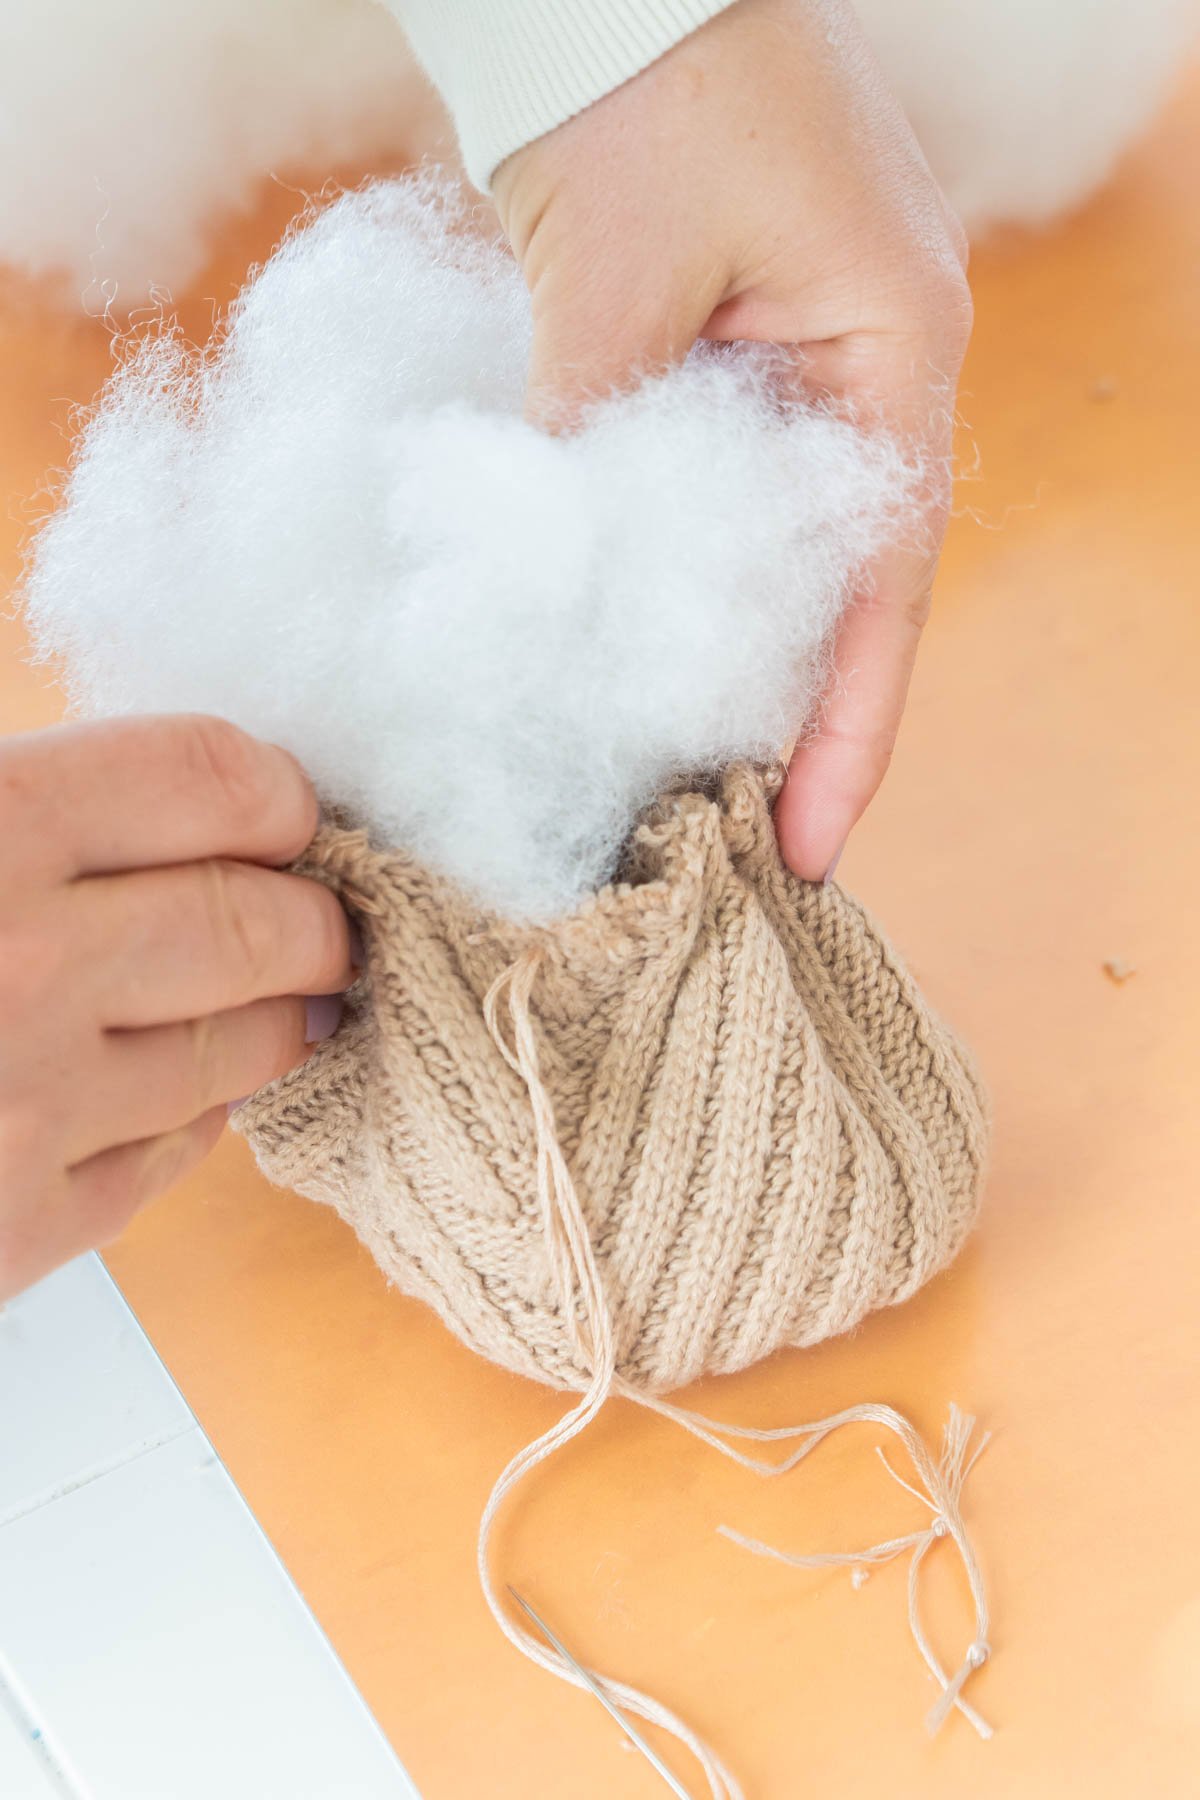
4 – Stuff the Pumpkin
Stuff the pumpkin with the fluff till it’s utterly full. You want it to be as stuffed as you possibly can with out having troubles, closing it.
After you have as a lot fluff as you need in your pumpkin, you’ll take the thread in your in a single hand and gently push the material opening closed with the opposite hand till it’s as tight as doable.
Then you’ll tie off the top of the material once more, preserving it as tight as doable.
Any free cloth may be tucked in to the within of the pumpkin by gently pushing along with your fingers or utilizing a pen as wanted.
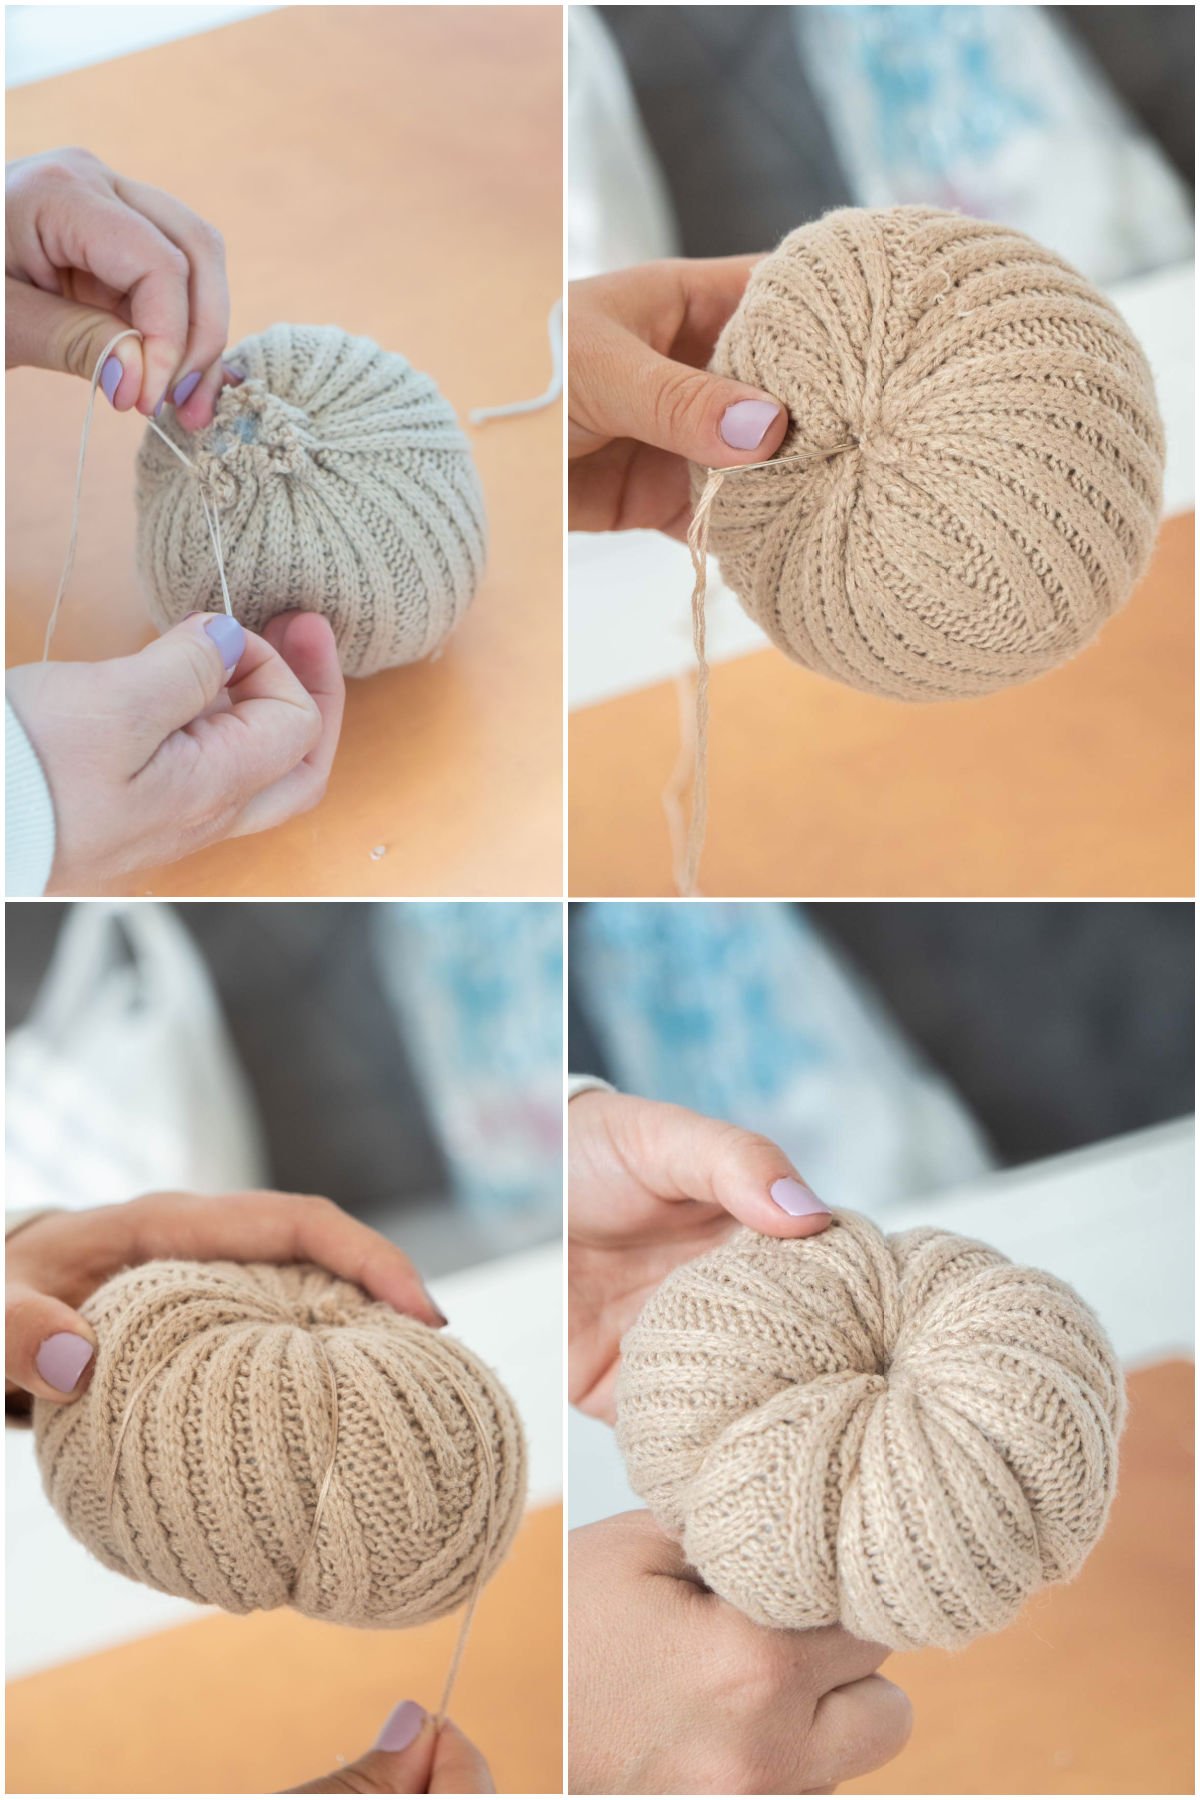
5 – Create The Grooves
Now that your pumpkin is stuffed and tied off, it’s time to create the pumpkin form.
Begin by adjusting the stuffing along with your fingers in your pumpkin as wanted in order that it’s as spherical as doable.
Subsequent, you have to to double thread your needle once more. You will have sufficient thread to wrap round your pumpkin thrice. The quantity will very relying on the scale of your pumpkin.
Additionally, you will have to make an additional giant, knot on the finish of your thread in order that it doesn’t simply undergo the underside of your pumpkin.
As soon as your needle and thread are able to go, begin by putting the needle by the highest of your pumpkin. Push the needle till you see it come out the middle of the underside of your pumpkin then pull the thread during. Make sure that to be careful in your fingers throughout this step!
Now take the thread and needle, and return to the highest of the pumpkin and repeat this step, pushing the needle by the highest of the pumpkin backside of the pumpkin. You’re principally making a loop round your pumpkin then pulling it tight to create the pumpkin indent.
You’ll proceed to do that six occasions, ensuring to put the thread the place you need the pumpkin ridges to go as you go alongside.
After you have the entire ridges accomplished, return by and tighten them one after the other to get the pumpkin look you need. As soon as the thread is tightened tie it off on the backside.
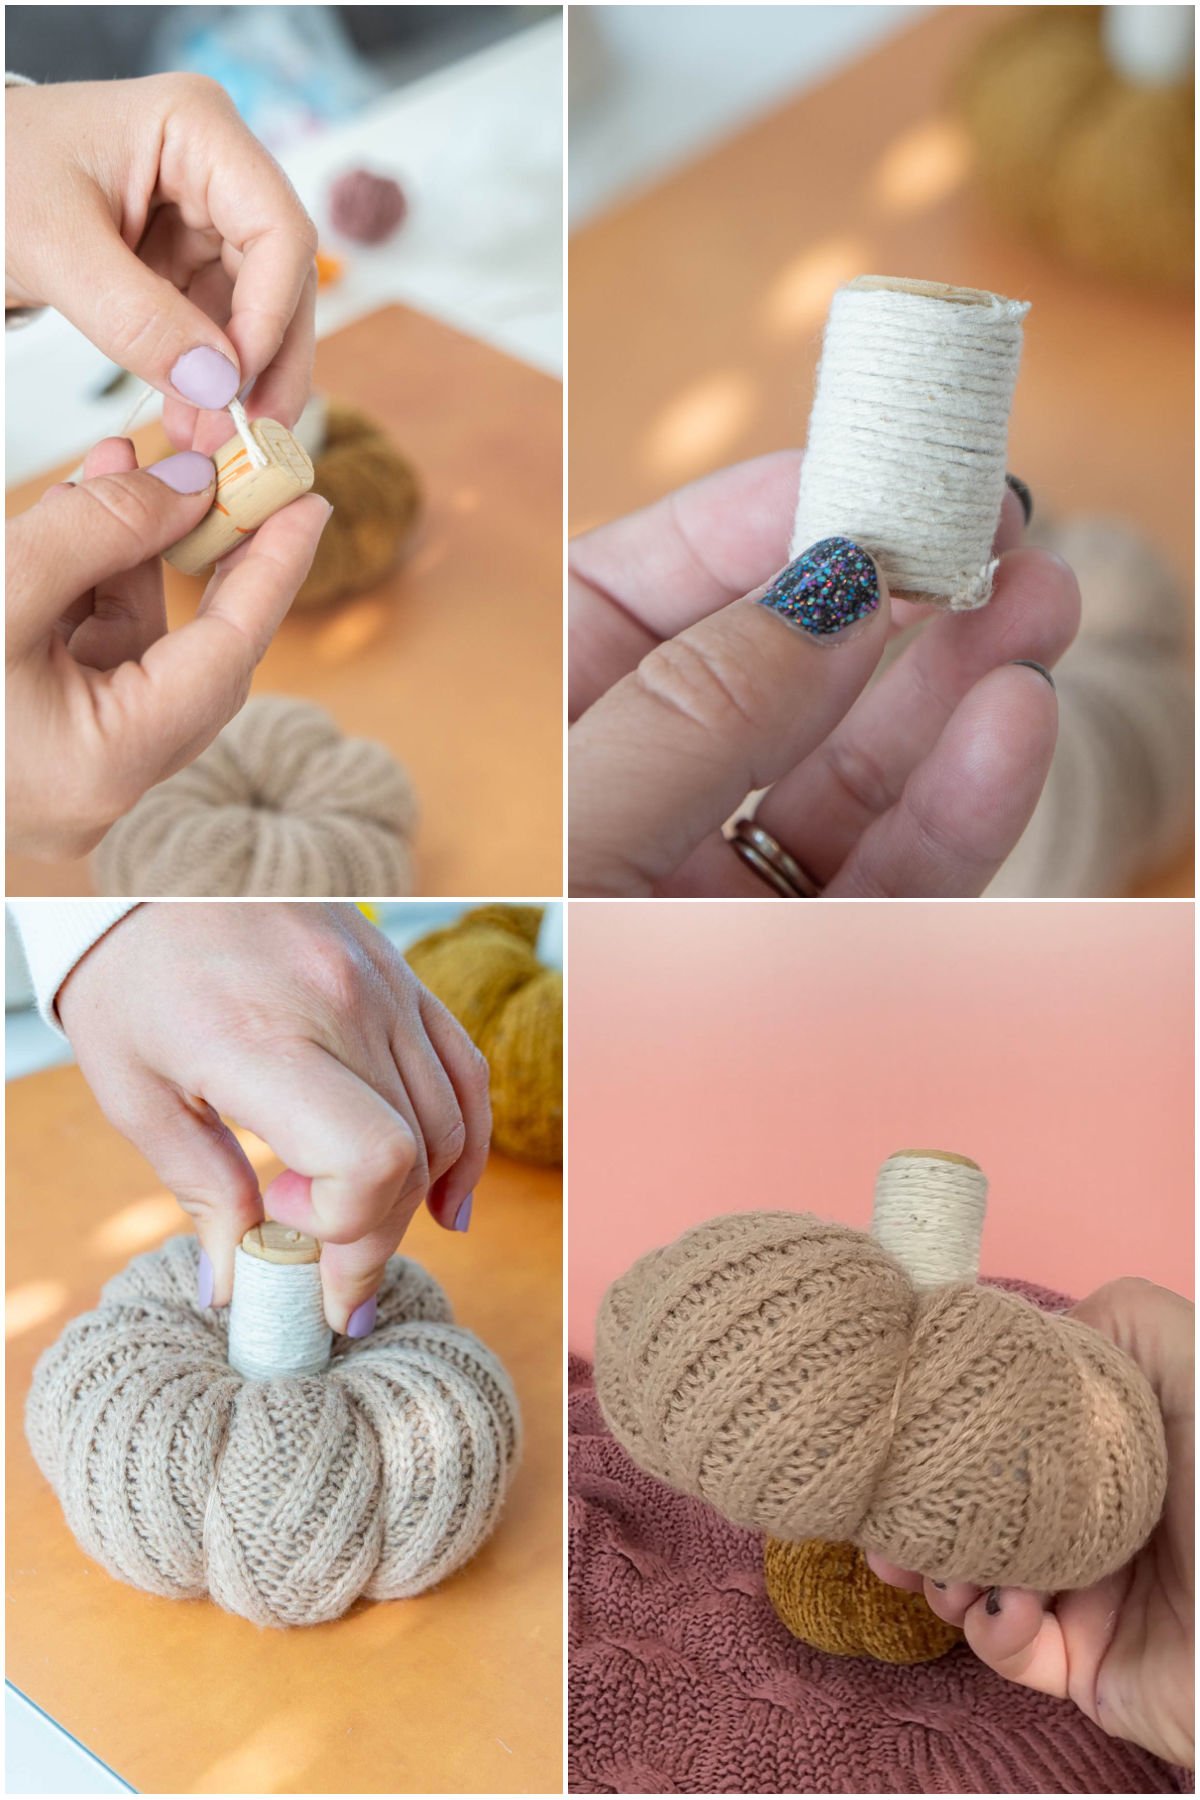
6 – Add Stem and End
Now that the pumpkin is fashioned, all that’s left to do is a stem.
For the stem, seize your cork, twine, and scorching glue. Place a small dab of scorching glue on the high fringe of the cork, adopted with the top of your twine.
As soon as the top is safe, start to wrap the twine tightly round cork till you attain the underside the place you’ll scorching glue it once more to safe the twine in place.
Lastly add scorching glue to the underside of your cork and place it firmly onto the highest of your pumpkin.
There you go – you now are the proprietor of your very personal sweater pumpkin! You possibly can both cease with one or use the opposite sleeves or physique (whichever you haven’t used but) to make different coordinating pumpkins so you’ve gotten your very personal sweater pumpkin patch!
Have everybody convey their very own sweater and do that as a craft fall evening – considered one of my favourite fall celebration concepts!

Sweater Pumpkin Video Tutorial
Should you’re extra of a visible learner, right here’s a fast video displaying the method of constructing these lovely sweater pumpkins! I extremely advocate utilizing it at the side of the written tutorial as a result of there are WAY extra particulars within the written publish!
Knowledgeable Suggestions
Make sure that to drag the thread tight to get the look of a pumpkin! Should you don’t pull it tight sufficient, it’ll simply find yourself trying extra like a ball or oval – not the lovable pumpkin you need!
Take your sweater with you to a craft retailer to decide on your embroidery thread or get a big pack of tons of colours just like the one I linked earlier than. You need it to match as carefully as doable so that you don’t see the thread!
Make your cuts fastidiously based mostly on how giant you need your pumpkins. You possibly can usually get two small pumpkins out of sleeves in case you reduce them in the best locations! However in case you reduce first and reduce proper within the center, you could find yourself losing a bunch of the sweater!
Check out completely different corks to present the pumpkins completely different seems. We have been fortunate sufficient to have some small, some odd-shaped, and a few greater ones. The range made them appear to be various kinds of pumpkins!
The larger the pumpkin the more durable it will likely be to make the grooves. The needle can simply get misplaced in all of the fluff with the larger pumpkins so watch out and keep away from having it greater than 8 inches extensive. Begin with a small or medium dimension pumpkin to observe on.
Should you like fall crafts, you need to check out these enjoyable concepts subsequent!
Serves sweaters
Lower the Sweater
-
If you’re utilizing a sleeve or cuff, lay the sweater sleeve horizontally throughout a flat floor. Then make one straight vertical reduce from the seam of the sleeve to the highest. This can detach the sleeve from the sweater utterly.
1 Giant sweater
-
Now that the sleeve is indifferent, reduce one other vertical reduce from the seam to the highest. This reduce must be a minimal of 4 inches away from the primary reduce.
Sew the Pumpkin
-
Start by threading your needle and tying the 2 ends of your thread collectively so you’ve gotten double the thread. You want sufficient thread to go across the circumference of your sleeve opening one and a half occasions.
1 pack Embroidery thread
-
Subsequent, flip your sleeve cloth inside out so the seam is on the surface.
-
Begin your working sew, roughly 1 / 4 inch from the sting of your opening. Proceed your working sew all the way in which across the fringe of the of the circle till you get again to the place you started your sew. Don’t sew by each side of the sleeve at one time!
-
When you get to the place you started your sew, take your two ends and pull them tightly till you shut up the circle.
-
Tie off the 2 ends, making them as tight as doable in order that the circle is closed.
-
Lower any free strings off and flip your cloth inside out in order that the tough edges are inside the pumpkin.
-
Thread the needle similar to you probably did earlier than and once more do a working sew across the exterior of the ultimate opening.
-
When you make it again to the place you started stitching gently let the needle and different finish of the thread lay to the aspect whilst you add the stuffing.
Stuff the Pumpkin
-
Stuff the pumpkin with the fluff till it’s utterly full. You want it to be as stuffed as you possibly can with out having troubles, closing it.
16 oz Pillow stuffing
-
After you have as a lot fluff as you need in your pumpkin, you’ll take the thread in your in a single hand and gently push the material opening closed with the opposite hand till it’s as tight as doable.
-
Then you’ll tie off the top of the material once more, preserving it as tight as doable.Any free cloth may be tucked in to the within of the pumpkin by gently pushing along with your fingers or utilizing a pen as wanted.
Create the Pumpkin Ridges
-
Begin by adjusting the stuffing along with your fingers in your pumpkin as wanted in order that it’s as spherical as doable.
-
Subsequent, you have to to double thread your needle once more and make an additional giant knot on the finish so it doesn’t simply undergo the pumpkin. You will have sufficient thread to wrap round your pumpkin thrice. The quantity will very relying on the scale of your pumpkin.
-
As soon as your needle and thread are able to go, begin by putting the needle by the highest of your pumpkin. Push the needle till you see it come out the middle of the underside of your pumpkin then pull the thread during.
-
Now take the thread and needle, and return to the highest of the pumpkin and repeat this step, pushing the needle by the highest of the pumpkin backside of the pumpkin. You’re principally making a loop round your pumpkin then pulling it tight to create the pumpkin indent.
-
You’ll proceed to do that six occasions, ensuring to put the thread the place you need the pumpkin ridges to go as you go alongside.
-
After you have the entire ridges accomplished, return by and tighten them one after the other to get the pumpkin look you need. As soon as the thread is tightened tie it off on the backside.
Add the Cork Stem
-
Seize your cork, twine, and scorching glue. Place a small dab of scorching glue on the high fringe of the cork, adopted with the top of your twine.
3 items Twine, 3 Corks
-
As soon as the top is safe, start to wrap the twine tightly round cork till you attain the underside the place you’ll scorching glue it once more to safe the twine in place.
-
Lastly add scorching glue to the underside of your cork and place it firmly onto the highest of your pumpkin.
Suggestions for selecting sweaters
Sadly not all sweaters will work for these pumpkin crafts or at the very least some sweaters will work higher for others.
Keep away from sweaters which have:
- Giant gaps, holes, or spacing within the design – you want to have the ability to sew the sweater collectively and enormous areas make it robust to do this.
- Lower sides, slits, or completely different size sides – you need to have the ability to reduce the sweater into one even rectangle so if there are slits or completely different lengths, you’ll find yourself having to waste numerous the sweater!
- Lace or any form of intricate designs – you’re going to be stitching by the pumpkin and pulling it tight. Keep away from something that may rip, tear, or be troublesome to work with once you thread by it.
- Zippers, buttons, or different chunky items – these are all going to be actually onerous to drag thread by!
- Cardigans – you need one thing that’s closed, not open.
- Materials that don’t stretch – persist with one thing that’s fluffy, chunky, and can stretch will when full of the pillow stuffing!
